Beretta PX4 Upgrades

The Beretta PX4 is a high quality DA/SA hammer fired handgun. It is extremely reliable and with low recoil flip due to its rotating barrel lockup rather than the typical tilting barrel. Good as it is, Langdon Tactical offers a number of upgrades ranging from parts to complete pistols with custom triggers, safeties, and other goodies. Many of these upgrades are available as drop-in replacement parts.

I bought two of the minor upgrades, an 11# hammer spring and the Optimized Performance Trigger Bar.

Langdon sells a range of hammer spring weights. 11# is the second lightest, which they recommend for all ammunition. Their 10# unit is recommended for American factory ammunition only as some European ammo has harder primers.

The effect of the 11# spring was to lower the double action pull from 10 pounds to 8-1/2 pounds. The single action trigger pull went from 5-1/2 pounds to 5 pounds. Both were noticeable differences. The new spring has functioned flawlessly.

As a Langdon video shows, on new guns it helps to “burnish” the hammer/sear surfaces by dry firing the pistol a few times while pressing on the back of the hammer. On mine this dropped the double action pull from 10-1/2 to 10 pounds all by itself.

The new trigger bar improves the trigger reset from about 0.24 inches to 0.07 inches. This helps a lot with split times.

Earnest Langdon makes these installations look easy in the videos on the Langdon Tactical web site but if you decide to do this you will want to watch their “Trigger Job in a Bag” video several times. For both you will want to study exactly how the trigger bar fits into the hammer/sear assembly in your gun before you start. Alternately take it all to a gunsmith.

The spambots are getting out of hand :  Please leave comments, friend, using the post in my comments category.  🙂

S&W 41 MAGAZINE LOADER

The “Mag Pal Speed Beez S&W Model 41 Clip Loader” from Amazon is a major aid to anyone with a Smith & Wesson Model 41 target pistol. Interestingly enough, this loader also works on Norinco TT Olympia target pistol magazines. Hope this helps someone out there.

The spambots are getting out of hand :  Please leave comments, friend, using the post in my comments category.  🙂

Electronic Earmuff Noise

One ongoing source of annoyance is the omission of critical specifications by manufacturers. A prime example is electronic earmuff noise. This is the hissing sound that can be heard in most audio systems when you turn up the volume without other input and is dependent upon the design of the preamplifier circuit. Some common muffs have so much noise that the claim of being used to heighten hearing to detect quiet sounds is essentially meaningless. These also have a high enough noise level to be really annoying at volume levels suitable for range conversation. As a result you turn them off and gain nothing over cheaper passive muffs. This noise level could be specified in dB for a given condition just like the NRR rating or the maximum amplified level. Since it is not, it is impossible to tell before buying a pair whether or not the noise level is too high for usability. Unfortunately, even the low noise units do not specify this and are probably losing out on some sales as a result.

One example of the latter are the Honeywell Howard Leight Impact Sport (20dB NRR) and Impact Pro (30dB NRR) muffs. These are high quality muffs and are very quiet. At least the Pro says it can amplify animal sounds up to 5X. Both of these have similar low noise levels compared to some other brands. Once I discovered this using a friend’s pair, I bought two Impact Pro’s (one for the wife) and donated my existing electronic muffs.

My recommendation, if you are looking into electronic muffs, is either buy Howard Leight Impact Pro units or go to a sporting goods or firearms store in person where you can try out various brands.

The spambots are getting out of hand :  Please leave comments using the post in my comments category.  🙂

A Tale of Two 22s

During the recent government panic induced by China many entertainment venues, including my favorite bar, were shut down along with most of the economy. Some of the few activities available were the local gun ranges and I spent a fair amount of time shooting. With ammunition shortages and high prices, much of it was with 22 LR. My 22 rotation was a Ruger Mark II, a Bersa 224, and a Norinco TT-Olympia, all of which work very well and are not ammunition sensitive.

Later, when firearm availability improved I was looking for something additional like a 22 revolver and came across a slightly used Walther “Colt” Gold Cup Trophy target pistol which I purchased. I’ve also owned a Jonathan Arthur Ciener 1911A1 22LR conversion kit for a while, which I finally applied to one of my 1911’s. The Ciener was iffy with several failures to go into battery, failures to fire, and some failures to eject requiring a tap with a brass rod to remove the shell casing stuck in the chamber. The failures to fire could be fired by recocking the hammer and trying again. This was possible as the the Ciener and Walther retain the 1911 hammer. The Walther was worse with similar failures and even one detonation slightly out of battery that blew brass fragments out the ejection port. It was also very inaccurate for some reason. Now I knew why this was on the used market. Upon careful examination with a bore sized gauge I determined that there was a slight ring of lead about two thirds of the way down the barrel. A light dawned. Apparently the former owner had also experienced an out of battery ignition, that, unlike mine, stuck in the barrel. A subsequent shot cleared the blockage but not before swaging a ring of lead into the bore. I had been shooting through this existing restriction, distorting the projectiles, and causing the accuracy problems. I was able to restore the bore with an aluminum bore size scraper, lead solvent, and a fair amount of brushing. This fixed the accuracy problem but I still had the unreliability of both guns to deal with. I had tried about eight different types of 22LR ammo, both match and standard, without any observable difference. A little investigation was indicated.

Stripping the Ruger, Bersa,and Olympia I tried dropping various 22 rounds into the chambers. All brands dropped fully into the chambers without hesitation. Then I tried the Ciener and the Walther. For these, rounds dropped into the chambers stopped anywhere between 0.190″ and 0.040″ shy of battery. This was starting to make sense. The failures to fire, apparently in battery, were rounds that stopped just shy of the chamber. The first firing pin strike pushed them against the chamber lip allowing the slide to go forward fully into battery. The subsequent recocked attempt fired the round. Undersize chambers would explain all the failure events. Time for more gauges … results below.

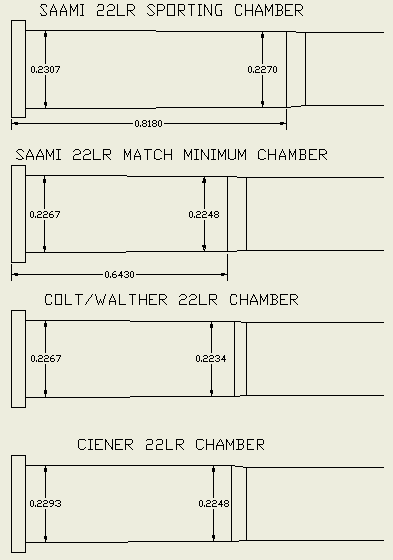
The Ruger, Bersa, and Olympia all had SAAMI sporting chambers. The chamber labeled MATCH below is for match RIFLE chambers. As shown below that, the Walther chamber is smaller than the rifle match chamber and the Ciener chamber is similarly sized. Both are well under the sporting chamber standard size.

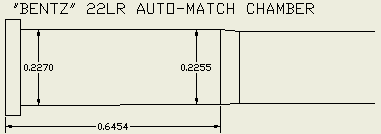
There is a recognized chamber for match autoloading pistols called the BENTZ. This is slightly larger than the rifle match standard chamber. Both the Ciener and Walther are distinctly tighter than this match pistol standard.

Others, Honest Outlaw for instance, have reported feeding problems with Walther 22’s … one suspects this is related.

The obvious solution is to give both to a gunsmith to have the chambers reamed out to the sporting dimensions but as I have an accurate small lathe and this is, after all, a hobby I decided to do it myself. Both the Ciener and Walther barrels are removable which eased the lathe set-up. I obtained a Manson Precision .22 LONG RIFLE FINISHER sporting chamber reamer from Brownells. It is necessary to finesse the Ciener ejector. (If this is not obvious then -> gunsmith) I indicated in the four jaw and the tailstock with a Jacobs taper chuck to hold the reamer concentric to <0.0005″. The main points here are to use a very slow speed, cutting oil, be very careful of the Ciener ejector as you feed the reamer, and most important, do not allow the shoulder of the reamer to contact the feed ramp on the barrel as you get close to bottom. If you nick the feed ramp you will probably ruin the barrel. You will NOT be able to run the reamer all the way in. This is not necessary as the cut described is completely sufficient to fix the feeding and reliability problems with the Ciener and Walther. As I finally found a 22 revolver, I now have six choices in my 22 rotation. 🙂

Please leave any comments in my comments post.

A windage myth

A common misconception about windage is that the wind speed at the target is the most important. Superficially this seems reasonable since the slower a bullet travels the more it is deflected by the wind. An M855 is deflected by a 10MPH wind by 3.6 inches between 0 and 200 yards, by an additional 4.6 inches between 200 and 400 yards, and by an additional 6.4 inches between 400 and 600 yards which adds up to 14.6 inches but the actual 600 yard deflection is 39.3 inches as shown below. Something else is going on.

The point is that unlike a sailboat with an autopilot, a bullet doesn’t know where the target is. The wind blows it off course and so it is traveling sideways. After the first 200 yards it is traveling in the direction of the green tangent above. If there were no wind between 200 and 600 yards it would continue in a straight line with a total deflection of about 18 inches. The wind for the first 200 yards is responsible for 47% of the deflection. Similarly the wind between 200 and 400 yards is responsible for another 37% and the final 200 yards of wind at the target end is responsible for only 16% of the total windage deflection.

Pay more attention to the wind speed and direction at the shooting end for better results.

Please leave comments using the post in my comments category.

Ortgies

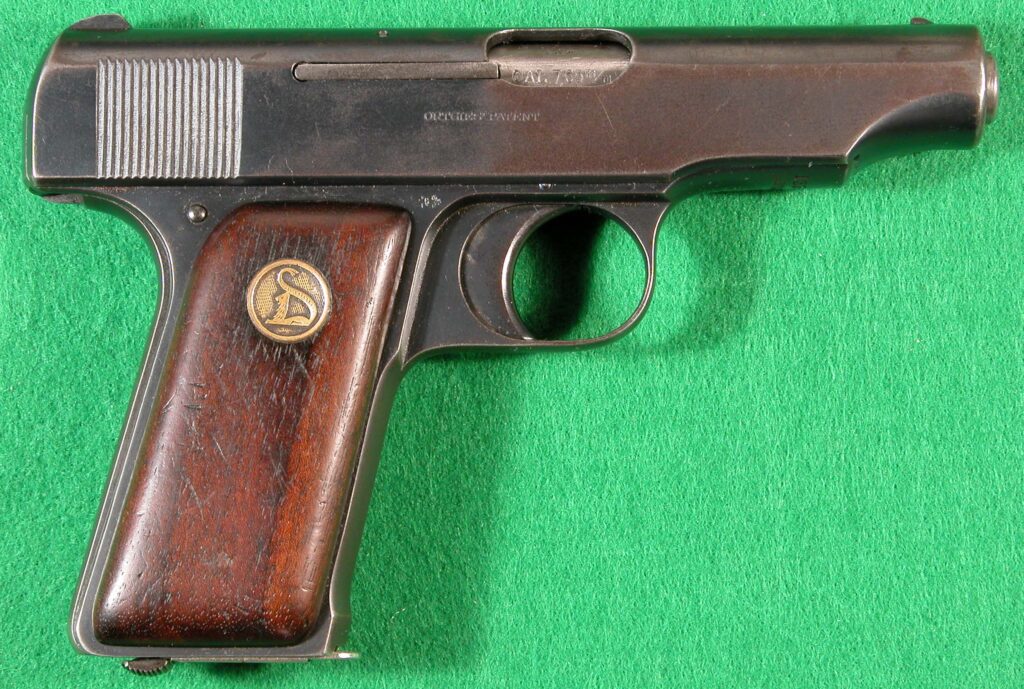
The Ortgies is a 1920-1927 production German pocket pistol that was very popular at the time and was imported in large quantities into the US.  It is externally similar to the Colt pocket pistol but completely different internally.  It is comfortable and pleasant to shoot.

In many ways it is an elegant design.  It has no screws.  It is nicely finished with no corners to catch on a pocket.  As a 100 year old striker fired pistol it should never be carried with a round in the chamber.  Here is a very good article about these pistols, and another here.

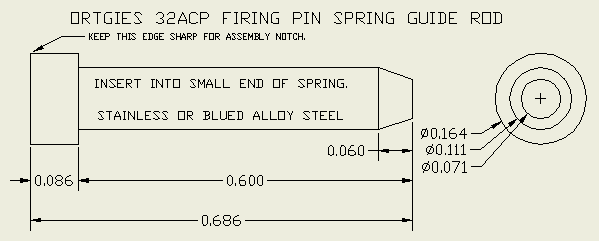
The main quirk of these pistols concerns the firing pin spring guide rod.  Firstly, when you field strip one of these the guide rod launches itself (with or without the spring) out the back of the pistol.  Field stripping instructions usually include an admonition to cover the back of the slide with a finger, disassemble in a plastic bag, or just to “take care” to not lose the guide rod.  Secondly, assembly is difficult unless you know the “trick”.  There is an assembly notch on the underside of the slide above the guide rod channel.  To assemble, compress the guide rod and spring and push it up into the notch.  Then you can replace the slide normally.  This is best practiced a few times without the firing pin spring and guide rod as bobbling the slide installation will also launch the guide rod out the back.  There are at least two different Ortgies guide rods.  One is 0.842″ long which is too long to fit in the assembly notch of some pistols.  Here is one that works in a fifth style 32ACP pistol which is the majority of production.

Note that it is important to insert this into the small end of the spring and insert the large end of the spring into the firing pin housing.  Otherwise the pistol will jam.

One other note, do not attempt to remove the grip panels without comprehensive disassembly instructions.  There is a latch inside the magazine well which must be pressed in to release the back edge of the grip panels. The front of the panels are hooked into the frame.  Great care must be taken as the wood engagement surfaces are very small and comparatively fragile.  In general, the grips should not be routinely removed as this is unnecessary for cleaning and only necessary for a detail strip.

Please leave any comments using the post in my comments category.

Small Arms Resistant Spotlight

The United States has not fought a symmetric war of front lines and maneuver since Korea.  From then on our actual opponents have not had artillery, tanks, or attack aircraft for more than a few days.  Symmetric warfare has been replaced by asymmetric warfare with the enemy using small arms, IEDs, and infiltration in Southeast Asia, Africa, the Balkans, and the Middle East.  The current response involves fortified bases with cleared fields of fire and targeted operations launched from those bases.  While night vision technology gives US tactical forces a big advantage at night, illumination of the base surroundings makes infiltration harder and aids target identification by troops without NVDs.  The main problem is that conventional spotlights and searchlights are both fire magnets and extremely vulnerable to ordnance.  While economical and very useful for general surveillance, conventional lights can be taken out by snipers at the start of an attack and need to be backed up by something more resistant to small arms that can reasonably survive a short firefight.  Small arms resistance should be sufficient as heavy weapons like artillery, tanks, and attack aircraft will have already been taken care of by the Air Force.  Also it should be possible to keep RPG teams beyond effective range with an adequate field of fire and enough light.  Conventional spotlight weaknesses fall into two categories.  Reflector surfaces are often silvered glass which shatters at the first hit.  A tougher reflector directs ricochets toward the light source, be it a light bulb, arc electrodes, or LED’s which are all easily destroyed by small arms projectiles or shrapnel.  “Bulletproof” glass is not very effective here as high velocity hits will craze it, reducing illumination, and ultimately break through, especially 12.7mm rounds.

The only light source which is truly bulletproof is an illuminating gas flame.  Properly armored reflectors and burners could provide a robust back-up to conventional lighting.  A typical illuminating gas would be acetylene burned in air which produces a bright white light.  Acetylene is readily available and is a normal part of the military supply chain.   Alternately, acetylene could be produced by generators at the light by reacting calcium carbide with a controllable water source.  Other illuminating gas mixtures could be optimized for the application.  Acetylene has been used for some lighthouse lamps from 1896 to the present.

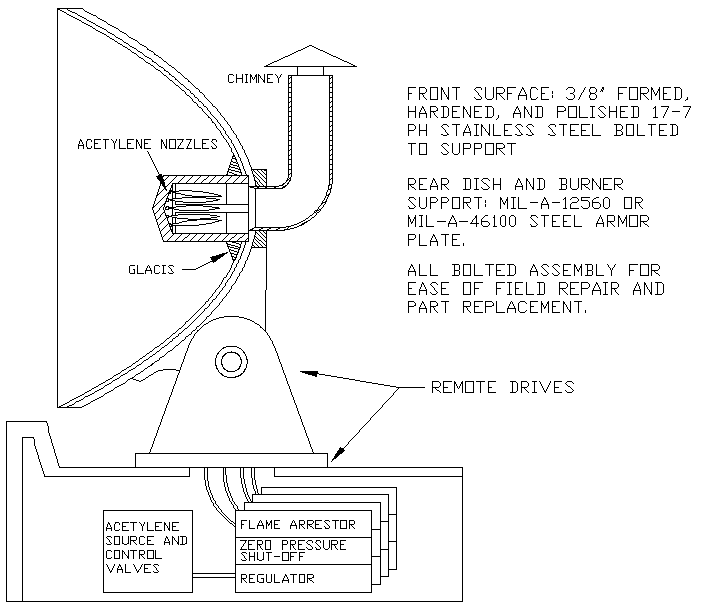
The illustration is for an acetylene tank version with a 3 foot diameter dish.  A carbide version could mount the generators on the back of the dish and eliminate the gas controls except for water shut-offs.

Since any light will be a fire magnet, it is critical that this be remotely operated with perhaps a covered manual override.  The tank is installed below grade or certainly under RPG proof cover.   The idea is to provide four redundant gas channels with separate nozzles, fed through unions in the pitch pivot.  The control modules consisting of the flame arrestor, regulators, and control valves for each channel would reasonably be mounted in the turret and move with it.   Each channel and the main tank would have a zero back pressure shut-off valve so that if a line is severed, flow to that line automatically shuts off.  A possible reflector would be 3/8″ of 17-7 PH stainless steel formed to the desired profile, hardened, and polished to a mirror finish.  This would be bolted to a curved backing plate giving full support made out of armor plate.  The plate would be bolted to the pitch/yaw mechanism.   The burner head would bolt to the mount and contain four separate o-ring sealed passages running between receivers in the mount and the burner nozzles.  Like all parts this would be a plug-in, bolted assembly to facilitate field repairs.  Flame ignition would be electrical or possibly catalytic depending upon gas choice.  A rear mounted chimney of a refractory material would direct the gas exhaust up and away from the mechanism.  This would avoid darkening the reflector with soot and spilling light onto the defenders.  The top of the burner assembly would have a sufficient thickness to resist small arms and have a conical top to deflect ricochets away from the dish surface.  Ricochets from the main part of the dish would pass though the flame without effect.  Near the center, a glacis would deflect shots safely that would otherwise ricochet into the gas nozzles.  The redundant gas channels and auto shutoffs would allow the spotlight to continue operating after losing nozzles.  The illustration is scaled for 7.62×39 but could easily be adapted for heavier weapon resistance.

Appendix Carry

For decades there have been four basic, agreed upon, civilian firearms safety rules.  (Police and military are slightly different.)

  1. All guns are always loaded.
  2. Never point the muzzle at anything you are not willing to destroy.
  3. Never touch the trigger until the sights are aligned with the target.
  4. Be sure of your target and what is behind it.

I have been noticing the appearance of so-called appendix carry including an inside the waist band variant, AIWB.  This places the holstered handgun in front of the strong side hip against the tummy, and for right handers, over the appendix, hence the name.  I suppose the idea is a quick draw from under an untucked shirt.

This is a really bad idea and seriously violates rule #2.  Expecting to use this for a fast draw under combat stress is a worse idea.  The muzzle is pointing directly at you-know-what if you’re male and similarly valuable parts if you’re female.  When sitting down it is pointed at your femoral artery.  These certainly fit in the not to be destroyed category.

All the traditional carries, back of the hip strong side, SOB, cross draw, western, and various shoulder rigs do not point the handgun at the wearer for a reason.

If you are new to concealed carry, be aware appendix carry is a dangerous fad to be avoided.  Every few months a news story appears somewhere in the country reporting on some free lance socialist who walked into a local store to rob it, grabbed his pistol from his waist band, and removed himself from the gene pool.    Massad Ayoob‘s StressFire explains how badly combat stress interferes with fine motor control including trigger discipline.  It is written for police training and tries to convey the difference between a range session and a firefight – kind of like the difference between seeing a picture of a roller coaster and riding one.  An excellent resource is Ayoob’s In The Gravest Extreme: The Role of the Firearm in Personal Protection.  This is written for civilians and ranges from tactics to legal issues.  Massad Ayoob is a highly respected police trainer, self defense author, and founder of the Lethal Force Institute.   Another resource is Jeff Cooper’s Principles of Personal Defense.  Arguably the best books written on the reality and effect of lethal action are Lt. Col. Dave Grossman’s On Combat and On Killing.  The point of reading these is to try to understand what’s going to happen in the event.

454 Casull Penetration

The 454 Casull was originally developed as a high performance hand gun hunting cartridge.  With about 50% more energy than a 44 Magnum it has become very popular as a bear defense handgun cartridge.  When in bear country, make noise while walking, use your tiny bells, and call out ‘hey bear’ or something periodically – Plan A.  Wild animals will often shy away from anything unusual.  If you see a bear heading your way with intent, a cloud of bear spray in front of the bear will often discourage it – Plan B.  If not, remember, bears kill and eat large animals on a regular basis.  That is nature, red in tooth and claw.  If you don’t feel like being  part of the nature menu right now it’s time for Plan C.

The main problem is that a bear has hundreds of pounds of massive, thick skull, thick fur, tough hide, heavy dense bones, gristle, and muscle protecting its vitals.  Ordinary handguns won’t do much to a Brown bear except make it mad.  As for all dangerous game, penetration is the most important consideration.  A flat meplat or bullet nose helps.  In preparation for a Western hiking trip I decided to test various loads both straight on and at a 45° angle to simulate a glancing impact.  The target was 1.5” of Purpleheart to simulate a skull or heavy bone, backed up by 6” of spruce in the form of four 2×6’s all held together by staggered 3” deck screws for a total thickness of 7.5”.  Purpleheart is the hardest wood I had readily available.  It is considerably harder and more crush resistant than Rock Maple, for instance.  For the 45° angled shots the slant thickness was 10.5” on the diagonal.

Ruger Super Redhawk, 454 Casull, 7.5” barrel, 21 feet from target

90° penetration

90° retained weight 45° penetration 45° retained weight

Buffalo Bore 7B 300gr JFN (exposed lead nose) 1550 fps

3.7”

284gr

3.0” (a)

288gr

Corbon Hunter 335gr HC (Hard Cast) 1550 fps

4.6”

194gr

4.6”

258gr

Corbon Hunter 325gr FPPN (Flat Point Penetrator) 1550 fps

> 7.5” (b)

325gr

10.1”

325gr

Federal Swift A-Frame (hollow point) 300gr 1520fps

5.0”

268gr

6.7” (c)

279gr

Kimber 1911 45ACP, 5” barrel, 21 feet from target

Remington UMC 230gr FMJ 835fps

2.1”

230gr

1.8” (d)

230gr

Remington Golden Saber +P 185gr JHP 1140fps

3.0”

185gr (e)

2.6”

185gr

Notes:

(a) The corner of the lead tipped JFN apparently caught on the 45° impact. It tumbled sideways and didn’t penetrate as far as the 90° shot.

(b) The 90° Corbon FPPN blew straight through the 7.5″ stack, the only round that did so.  Even though the bullet was not recovered there was no jacket or core material in the channel through the wood.

(c) The 90° Federal Swift A-Frame expanded as expected, retaining 89% of its weight.  The 45° impact shot collapsed the A-Frame hollow point from the side, causing  that round to not expand significantly, to penetrate farther, and to retain more of its weight.

(d) The 45ACP FMJ distorted for the 45° impact and tumbled slightly resulting in less penetration.

(e) Both of the 45ACP Golden Sabers packed Purpleheart into their hollow points and did not expand.  They also did not loose any weight.  The 45° shot tumbled slightly.  I added the 45ACP to illustrate the difference between a personal protection cartridge and a bear cartridge.

Note that the 45° Corbon FPPN penetrated 10.1″.  It kept straight all the way and was not diverted or destabilized by the angled impact.  This is a hard lead core flat point bullet with a thick jacket that completely covers the core including the base.  Here is what one looks like after going through 10.1″ of wood.

Unfortunately it’s not available anymore.  If you are looking for this kind of penetration there are some alternatives.  Grizzly sells a 300gr 1400fps metal jacket lead core round.  These use the Belt Mountain Punch bullets.

Another possibility is the Magtech 260gr 1800fps lead core FMJ Flat.

There are monolithic copper penetrators from manufacturers such as Underwood.  As they are less dense than cored bullets, they take up more powder space for a given bullet weight and can’t be loaded to the same energy levels as a lead core bullet.

I’m waiting for someone to make a tungsten cored heavy brass jacketed flat nose penetrator.  As tungsten is denser than lead, this would leave even more powder space for a given bullet weight.

One common recommendation for this application is the Hard Cast bullet.  Note that these penetrated less than half as deeply as the FPPN with a heavier bullet at the same muzzle velocity.  Here’s the 90° HC after 4.6″.  Also note that it only retained 58% of its weight.

The Federal Swift A-Frame penetrated deeper than the hard cast, retained over 89% of its weight, and expanded to 0.75″ as recovered.

As it turns out, I have enough Corbon FPPN for all the predatory bears I could conceivably meet so that’s what I’ll be carrying.  If I couldn’t use that,  I’d either take Federal Swift A-Frames or repeat the test using Magtech FMJ Flat, Grizzly Punch, and the Underwood Penetrators.